
How to Brief a Property Virtual Tour Route
A method for developers, architects and agencies: framing the views, navigation, mobile experience and sign-off for a virtual tour before the quote.
By VIZION STUDIO
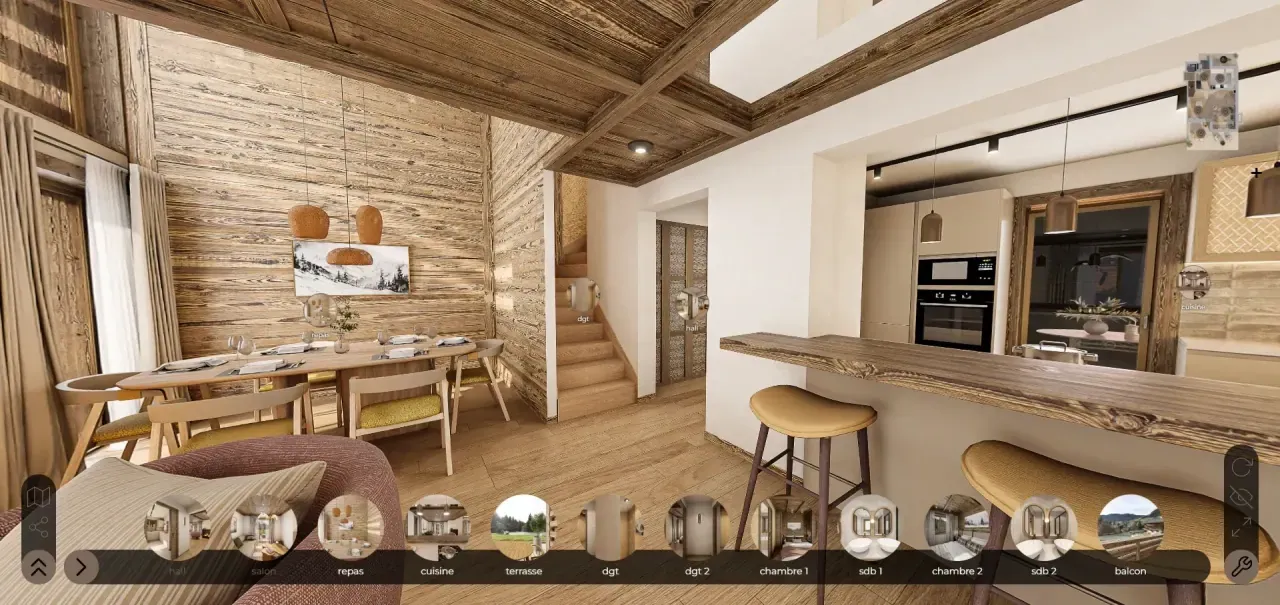
A useful property virtual tour is not just a sequence of panoramas. It organises a route: what the buyer discovers first, the spaces they can compare, the information they come away understanding, and the action they can take next. Before production starts, the brief needs to describe a tour experience, not just a list of rooms.
This guide helps developers, architects and communication agencies prepare that route. It covers how to frame the views, the transitions, the content, sign-off and distribution, so the studio can propose a coherent scope. It does not promise a commercial result: it turns a marketing intention into decisions you can observe and test.
Fix the Decision the Tour Should Make Easier
Start with the question the user needs to resolve. Do they want to understand a flat's layout, appreciate the proportions of a room, find their way around a development, compare unit types, or check the relationship to a view? Avoid vague goals such as “impress the prospect” or “create a wow effect”. They express a creative ambition without saying what needs to be shown. Prefer a verifiable objective instead: “let a buyer walk through the main rooms of a unit type, identify the outdoor spaces, and reach a request for information about the scheme.”
Identify the Main Audience
The route taken by a prospect browsing alone on a phone is not the same as one led by a sales adviser in a sales office. The first needs an immediate entry point, visible landmarks and short navigation. The second may narrate the tour, move between unit types, and rely on a large screen.
Describe the main audience, their context, and what they already know about the scheme. If several uses are planned, rank them by priority — this decision affects labelling, the number of views, camera set-ups and how deep the route needs to go.
Define the Next Action
A tour should not end in a dead end. Link it to an action that the site can genuinely handle. Also state what information may be captured with the user's consent, such as which unit type was visited or how far they got. Do not ask the studio to invent a data-collection rule or an integration that has not been approved by the people responsible for it.
Map the Route Before Choosing the Panoramas
Represent the path as a sequence. A simple version might start in the living room, offer access to the kitchen and the terrace, then open onto the bedrooms. Another might start from a plan or an exterior view before entering the home. The right order depends on the decision you defined above.
For each step, note the public name of the space, the starting view, the possible exits, and the main piece of information it conveys. This map lets you spot detours, duplicates and dead ends before any images are produced.
Choose an Understandable Entry Point
The first view needs to give the user a landmark. A central room, a recognisable hall, or an overview shot can help them understand where they are. A spectacular but hard-to-place framing risks creating confusion right from the opening.
Specify what needs to be visible without any interaction: the unit type's name, the current room, the navigation controls, and access to a menu. If the tour sits inside an already content-rich page, describe how it should stand out from the rest of the content.
Limit the Number of Branches
Every extra panorama needs its own production, sign-off and place in the navigation. Do not multiply viewpoints just to cover the whole floor area. Keep the views that answer a real question: the relationship between the living room and the terrace, the width of a corridor, the light in a bedroom, or the layout of a suite.
A secondary space can be represented with a fixed image or a note on the plan when a full panorama would not add any real understanding.
Plan for Return and Orientation
Describe how the user gets back to a previous point, opens a plan, or finds the list of spaces. Transitions need a stable meaning — an arrow towards the terrace should not change function depending on the view.
Also plan the tour's starting state when it is relaunched. Does it restart from the beginning, keep the last view seen during the session, or offer a choice of unit type? Decide this before integration.
Select the Spaces That Answer Real Objections
The list of views should come from questions genuinely raised during sales, not from an exhaustive inventory of rooms. A buyer may want to understand the depth of the living room, the link between the kitchen and the dining area, access to a balcony, or the separation between day and night zones. These needs are more useful than a room-by-room checklist.
Bring the sales, scheme, architecture and communication teams together to rank the spaces. Ask each of them to flag the points that need a visual explanation, and the elements that may still change.
Build a Spec Sheet for Each View
For every viewpoint, record:
- The unit type, level and room's name.
- The view's purpose and the question it answers.
- The desired camera position and orientation.
- Its links to the previous and next views.
- The architectural elements that must stay visible.
- The mood, furniture and references expected.
- Any information or labels shown in that view.
- The person responsible for signing it off.
Add a status: essential for launch, desirable, or out of scope. That lets the studio price a comparable base and isolate the optional items without ambiguity.
Separate Representative Spaces From Actual Units
A tour of one unit type can help a buyer understand a home without matching every unit in that family exactly. If the orientation, the openings, the terrace or the layout vary, the scope of what the tour represents needs to be explicit.
State which variants are covered, and which are not. Have the scheme's own team approve the necessary disclaimers. A visualisation should never imply that a layout, an exterior view or an amenity is identical across every unit.
Prepare Sources, Views and Sign-Offs
The studio needs documents that are clearly identified and dated. List the plans, sections, façades, models, specification notices, material boards, furniture references and landscaping information. For each file, note its revision, its date and its role.
When one source contradicts another, name the person who decides. The studio should not have to decide alone whether a layout drawing takes precedence over a technical plan, or whether a provisional finish can be shown.
Document Your Assumptions
Keep a list of assumptions separate from approved elements. It may cover furniture, light fittings, planting, exterior views or amenities. For each one, state whether it should be excluded, shown provisionally, or left pending a decision.
This transparency avoids implying that a piece of furnishing, an exterior view or an amenity is identical across every unit.
Organise Sign-Off by Milestone
Approve geometry and framing first, then materials, layout and lighting, and finally the tour's interface. Mixing every correction into a single stage makes it hard to track who is responsible for what.
Build one consolidated set of feedback per milestone. A single point of contact should gather comments from the architect, the developer and the agency, resolve any contradictions, and issue a dated version. The number of milestones and how they work is for the quote to define.
Define the Interface and the Interactive Points
A property virtual tour can include navigation points, captions, a plan, a gallery, or links to other content. Every element should help the user understand something or take an action. A purely decorative interactive point adds visual load without necessarily improving the route.
Build a list of controls and write their labels. “Go to the terrace” is clearer than an icon with no explanation. Link text should describe its destination with a clear instruction, and meaning should never rely solely on an icon's shape or colour.
Plan for Incomplete States
Decide what appears when a view, a piece of information or a unit type is not yet available. The interface can hide the access point, show an explicit status, or offer an alternative. A button that leads nowhere feels like something is broken.
Also plan for loading, error and retry states. These are part of the delivered product, even if they never appear in the presentation images.
Adapt the Experience for Mobile
The tour needs to be designed for the devices it will actually be used on. On a phone, the available space for controls is smaller, gestures can conflict with scrolling the page, and the network connection may be less stable. The brief should state the priority screens and the tests expected.
Do not mechanically port a large-screen interface across. On mobile, limit the number of controls shown at once, keep a visible way to exit, and check that text stays legible without covering the panorama.
Define Gestures and Orientation
State whether the experience works in portrait, landscape, or both. Document the gestures: dragging to look around, tapping a point to move forward, pinching to zoom if that is useful. A short initial instruction can be enough, as long as the user can call it up again.
Navigation should remain possible without requiring the user to physically move the device. If a gyroscope mode is offered, plan an explicit control to turn it on and a touch-based alternative.
Plan a Lightweight Fallback
A full experience may not suit every device or every connection. Describe a fallback: fixed views, a gallery, an annotated plan, or direct access to the essential information. This fallback needs to let the user understand the property and carry on with their journey.
Core Web Vitals are commonly used measures of experience quality. The brief can ask for load time, responsiveness and visual stability to be measured on the real page, without assuming a particular score is guaranteed ahead of integration and field testing.
Plan for Accessibility and Alternative Content
An immersive scene is highly visual, but essential information should not exist only inside the panorama. Name the rooms, make controls identifiable, and provide a text alternative for any content that carries information.
Follow good practice on structuring headings, writing explicit labels, and using alt text that communicates the function or the information behind an image. The page hosting the tour should keep a readable content structure, and the user should be able to reach important information without depending on a complex gesture.
Make the Route Explicit
Show the current room and the destinations available from it. A list or a plan can complement the arrows shown inside the panorama. Selected states need to be perceivable by more than colour alone.
Test with a keyboard where the interface allows it, check the order of navigation, and make the focus state visible. If some functions cannot be reproduced exactly, document an alternative that gives access to the same essential content.
Write Without Internal Jargon
Use the names buyers actually understand. A technical reference or a unit code can stay available for internal teams, but the public-facing text should explain the space or the action. Short sentences are easier to read in an interface layered over a busy image.
Define Distribution and Integration
State where the tour will be published: a scheme page, a campaign site, a sales presentation, or a screen in the sales office. Describe the domain, the page template, the languages, the cookie policy, and any other components that will sit around the experience.
Embedding the tour into an existing page needs to specify the module's size and how it behaves as the page scrolls.
Vizion Studio's virtual tour service presents the format across the wider range of sales and marketing tools available. Your brief, though, should stay specific to your scheme, its unit types and the media it will appear on.
Frame Tracking and Measurement
List only the events tied to a precise question: the tour being opened, a room being accessed, the plan being used, or a click through to contact. Do not collect interactions without knowing how they will be interpreted.
Cookies and other trackers are subject to consent rules, with specific conditions for certain exemptions. Have the mechanism, its purposes, retention periods and access rights approved by the people responsible before going live.
Prepare Quality Assurance Before Delivery
Testing should reproduce full routes, not just check that every image opens. Write out complete scenarios: start in the living room, reach the terrace, open the plan, go back to the bedroom, then reach contact — each with its expected result.
Add edge cases too: a narrow screen, a slow connection, a different orientation, an unavailable resource, closing an interactive point, and going back. Test on the browsers and devices defined in the brief.
Check Substance and Form Separately
Split checks into four families: architectural accuracy, visual consistency, how the route functions, and web integration. A view can be faithful to the project but poorly linked to the rest; an interface can work correctly while showing outdated information.
Assign each issue to a family, a view and a version. Add a screenshot or the steps to reproduce it where that helps. Feedback then becomes easier to fix and to verify.
Approve Disclaimers Before Release
Check the text, credits, statuses, disclaimers and the limits of what the tour represents. Verify that the final call to action leads to the right destination, and that the public page is not exposing a test version.
A production sign-off does not replace the decision to go live. Identify who authorises release, and the exact version they are approving.
Brief Template to Send the Studio
You can structure your document under the following headings:
- Scheme, unit types affected and status of the documents.
- Main audience, context of use and the decision to make easier.
- Expected action after the tour, and its destination.
- Route map, entry point, returns and exits.
- List of views, their objectives, cameras and priorities.
- Variants represented, assumptions and necessary disclaimers.
- Sources, revisions, dates and who signs off.
- Mood, furniture, materials, lighting and exterior views.
- Interactive points, content, controls and incomplete states.
- Devices, screens, orientations, gestures and fallback.
- Accessibility, languages, integration, hosting and measurement.
- Milestones, QA scenarios and release authorisation.
Attach a completed spec sheet for each view and a diagram of the main route. Flag open decisions rather than hiding them inside a list of references.
To prepare a scope suited to your scheme, send your brief to Vizion Studio.
FAQ
How many panoramas should I plan for? There is no universal number. Keep the viewpoints needed to understand the unit type and answer priority objections. A redundant panorama adds production and sign-off work without automatically improving the experience.
Do I need to represent every room? No. Main rooms and important spatial relationships come first. A fixed view, a plan, or a caption can be enough for a secondary space. The choice should stay consistent with your objective and buyers' actual questions.
Can a single tour represent several units? Yes, if the scope of what it represents is clearly defined and approved. Differences in orientation, openings, exterior view or layout need to be flagged. Where these gaps would change a buyer's understanding, a separate variant may be needed.
Can work start before all materials are approved? Yes. Work can be prepared using clearly identified assumptions, but their status and how they are handled need to be documented. Decide what can be shown provisionally, what has to wait, and who approves the final version before release.
How do I compare quotes from several studios? Send the same route, the same list of views, the same sources and the same deliverables to each one. Ask every provider to state their assumptions, exclusions, sign-off levels, integration terms and update conditions.
What measurements should I plan after launch? Choose only the events tied to a real question: which rooms are opened, where users abandon the route, or how many reach the contact step. Have consent and data governance approved before implementation.
3D services to bring your project to life
Preparing a property launch or an architectural presentation? Explore deliverables and examples relevant to this topic.
Give your project the images that will sell it
Get your first 3D image within 72 hours. Free quote, no commitment.