
How to Brief a 3D Site Plan
A working method for developers, architects and agencies: gathering reference documents, choosing the framing and defining deliverables for a 3D site plan.
By VIZION STUDIO
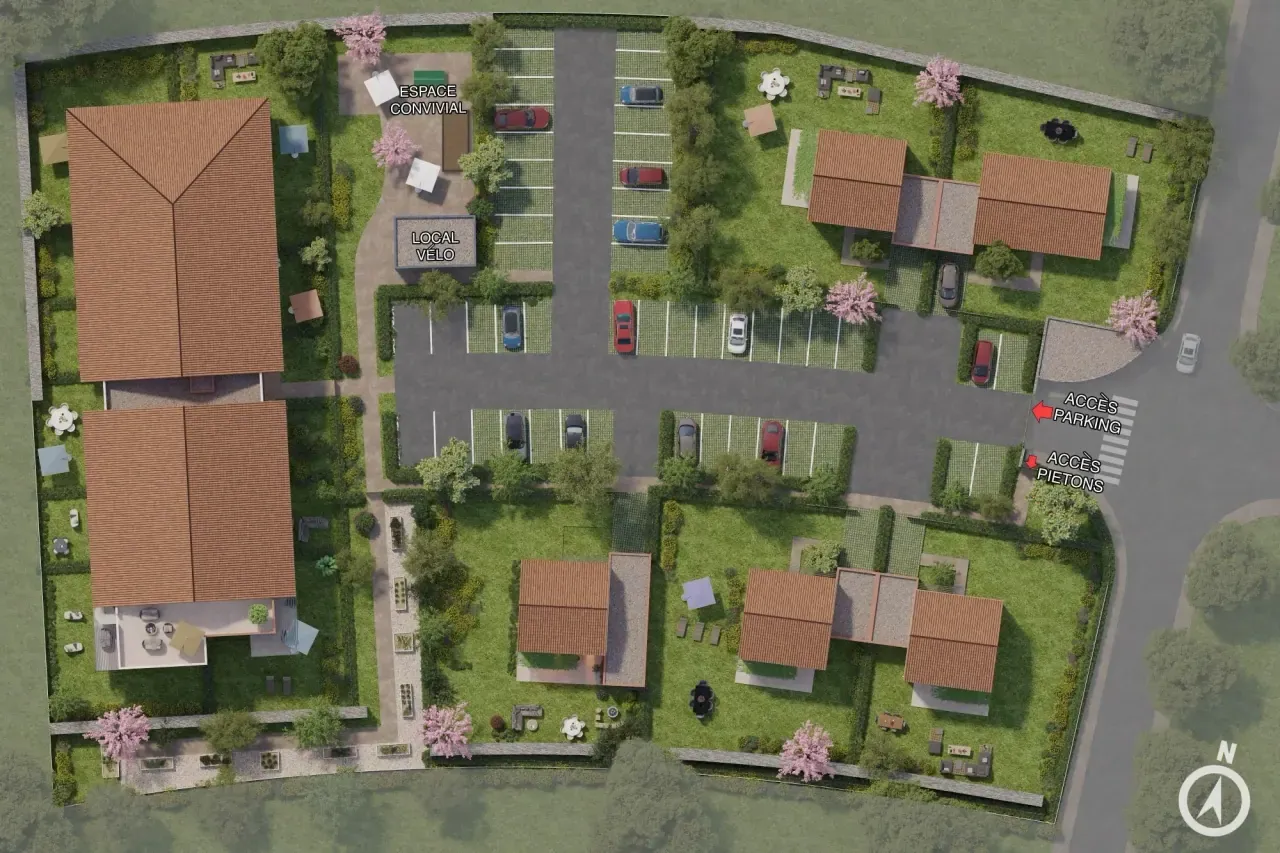
To commission a 3D site plan that supports your marketing, prepare a brief that sets out the buildings to show, the access points, the outdoor spaces, the framing and the channels the image will be used on. Attach up-to-date layout documents and flag anything that is still provisional. That way the studio can propose a clear production scope, rather than guessing what your team wants to show.
This guide is for developers, architects and property-marketing agencies preparing an order for a 3D site plan. It is not a software tutorial or a gallery of renders: it is a method for gathering the right documents, deciding on the visual choices and writing a brief the studio can act on. The template at the end of the article can be reused for your own consultation.
Define what the 3D site plan needs to explain
A 3D site plan is an overview that shows how the buildings sit on the plot and how the outdoor spaces are organised. Its main job is to explain spatial relationships, not simply to produce an attractive image.
Start with a sentence that states the intended use. “Show the pedestrian route from the street to the entrance halls” is a verifiable objective. “Make an attractive image of the scheme” leaves the framing, the level of detail and the placement of any labels wide open.
Choose a primary use
An image used during a sales appointment can be supported by a sales adviser's explanations. The same image, viewed alone on a phone, has to be understood with far less help. For a brochure, you also need to plan for where the caption and any supporting text will sit in the layout.
So specify the priority channel and the questions the visual needs to answer. Keep the essential messages limited — layout, access and shared spaces, for example. Secondary information can go in a caption or on another format.
Do not confuse this marketing image with the technical drawings used by the project teams: the two serve different purposes and are not read in the same way.
Gather your reference documents
Prepare an organised reference pack, with a list of the documents and their version or date.
To frame a 3D site plan for your scheme, gather whichever of the following are available:
- The up-to-date layout plan, with the boundaries of the area to be shown.
- The plans, elevations and sections needed to understand the buildings.
- Level and ground information relevant to the visible volumes.
- The landscape plan, or the confirmed landscaping intentions.
- Pedestrian routes, vehicle access and parking, clearly identified.
- References for materials visible from the intended viewpoint.
- Context markers: roads, neighbouring buildings, available photographs.
- The brand guidelines, building names and labels to be displayed.
Usable file formats are confirmed with the studio. A working file can be paired with a reference PDF to make it easier to check. Avoid asking the supplier to guess which version takes precedence between two conflicting documents.
Flag missing pieces
A landscape still being defined, an unresolved boundary fence or an access route that may still change all need to be flagged. For each point, state whether it needs a decision, can be treated as an explicitly approved assumption, or should be excluded from the first proposal.
This list of open items is useful to every team involved. It stops a visual suggestion from later being read as a final project decision, and it separates the decisions that genuinely block production from the details that can be added later.
Define the context and the level of detail
The area shown does not necessarily stop at the buildings being marketed. The street, neighbouring buildings or a nearby amenity can be essential for situating the scheme. But showing everything at the same level of detail risks making the scheme itself harder to read.
Define three zones: the scheme itself, its immediate surroundings, and the wider context. For each, specify the information needed and the references available. The central zone can be detailed, while the wider context is simplified without changing the important spatial relationships.
A simplified neighbouring building still needs a recognisable presence if it affects how the site reads. Conversely, a distant façade with no role in the message does not necessarily need the same treatment as the scheme's main entrance.
Distinguish existing, planned and assumed elements
Have the existing, newly created and still-to-be-confirmed elements clearly identified. This distinction matters in particular for trees, pathways and neighbouring buildings. A simple code in the reference pack is often enough to avoid ambiguity during framing.
In the image below, the main buildings are detailed and several surrounding volumes are simplified. This example illustrates a graphic hierarchy; it does not provide information about your own scheme's characteristics. The rule to keep in mind is to decide what each level of detail needs to convey.
Choose between a top-down view and an angled aerial view
The term 3D site plan can refer to different types of framing. Have the viewpoint confirmed before detailed work begins on materials and planting. A strictly top-down view and an angled view do not highlight the same information. If you are still weighing up a site plan against a fully furnished 3D floor plan or rendering, it helps to settle that choice first, since it affects the brief for either output.
The top-down view, for reading the layout
This makes it easier to identify building footprints, pathways and outdoor spaces. It can suit an image annotated with building names or access arrows. On the other hand, it shows façades and the height of the volumes less directly.
The cover image for this article gives an example: buildings surround a service road and parking area, with markers identifying pedestrian access, parking, a bike store and a shared amenity space. A north arrow completes the reading of this particular view.
The angled view, for understanding the volumes
This makes façades, differences in height and the relationships between buildings more visible. Some access points, though, can end up hidden behind a volume in the foreground or behind planting. The framing therefore needs to be tested against the intended message.
Ask for a simplified framing proposal and review it at the actual output format. If an essential piece of information is not visible, it is usually better to change the angle or plan a second view than to add extra arrows to compensate. A second view is a deliverable to scope in the quote, not an automatic consequence of the original order.
Organise access points, landmarks and landscaping
A buyer will not necessarily read the plan the way the design team does. The markers need to help them mentally walk through the site. Check that they can tell vehicle access from pedestrian access, and find the building entrances, without knowing the underlying documents.
Prepare a list of the annotations you want, with their exact wording. Use the same names as on the brochure, the website and the sales material. A building labelled “A” on the image and “Garden Residence” everywhere else creates unnecessary extra work for the reader.
Keep the image legible
Not all information needs to appear directly on the render. The main labels can stay on the image, while more detailed explanations go in a caption. If colours are used to tell buildings apart, back this up with another marker, such as a letter or a name.
For landscaping, specify which planting is being kept, which is planned, and the stage of representation expected. More mature trees can hide an entrance or change how a space is perceived. Discuss their presence and apparent size rather than treating them as simple decoration.
Link the overview to the ground-level experience
The site plan explains the layout; an exterior rendering helps buyers look at the façade and its surroundings from a viewpoint closer to everyday use. These two formats are complementary, but they need to reflect consistent material and landscaping choices.
The image below illustrates this change of scale: the façade, balconies, trees and pathway become the main elements. It is a separate VIZION STUDIO visual, shown here to compare types of framing, and not a second view of the scheme shown in the cover image.
Plan for web, mobile and print deliverables
Specify the intended uses from the brief stage: a scheme page, a brochure, a hoarding, a sales presentation or a document sent by email. Then ask the studio, and the graphic designer or printer if relevant, to agree on suitable dimensions and formats.
A large, detailed image is not automatically legible on a phone. Check the size of the annotations when the visual is shown at the actual width of the screen. If they become too small to read, plan for a simplified version or a separate caption rather than forcing the reader to decipher the whole image.
For print, provide the final layout dimensions and any constraints set by whoever is handling production. For the web, agree on a version that keeps the essential markers without unnecessarily slowing down the page. Avoid setting a single file-size target without considering the image's complexity and its intended use.
Pair the visual with accessible text
An image that carries a lot of information deserves a readable explanation outside the image itself. Accessibility guidance on complex images generally recommends a short text alternative, backed by a description of the essential information, whenever an image cannot be summarised in a single sentence.
For a scheme page, this description can explain where the buildings are, which access points are shown, and how the shared spaces are organised. It should not simply repeat a string of keywords. Also plan for a visible caption and clear file names, so teams can find the right deliverable.
Scope the quote and the decisions before production
A comparable quote depends on a comparable scope. The number of buildings alone does not describe the work involved: the terrain, the context, the annotations, any variants and the output files all factor into the definition of the service.
Ask for the number of views, the area covered, the elements supplied versus the elements to be built, and the review stages to be spelled out. Also clarify how project changes made after the start of production will be handled.
The schedule depends in particular on the availability of documents and pending decisions. Give your intended use date, then have its compatibility with the planned stages confirmed. Do not present an internal deadline as a date the studio has already agreed to.
Name the decision-makers
Assign a lead contact for architectural documents, and a separate one for marketing uses if needed. One point of contact should be able to consolidate feedback before passing it on. Otherwise, the supplier risks receiving conflicting requests about the same framing.
Brief template for your 3D site plan
Use the following headings in your request. Replace anything not yet decided with “to be confirmed”, rather than leaving a blank field for the studio to interpret.
- Scheme and contact: project name, location, person handling the exchanges.
- Primary use: distribution channel and the question the image needs to answer.
- Area covered: buildings, terrain, roads and surrounding context to be shown.
- Documents: list of attachments, dates, versions and which one takes priority.
- Framing: top-down view, angled view, or a proposal expected from the studio.
- Access and markers: entrances, pathways, parking, names and annotations.
- Landscaping: available documents, elements kept, planned changes and decisions.
- Deliverables: number of views, variants, dimensions and layout constraints.
- Review: people responsible and the method for consolidating feedback.
- Schedule: intended use date and dates for any decisions still pending.
- Open items: missing pieces, permitted assumptions and excluded elements.
Before sending, check that every document mentioned is attached and named to match the brief. Make clear which points need a proposal from the studio, such as the framing, and which should not be reinterpreted, such as a confirmed main entrance.
If you are scoping this kind of production for a sales launch, set out the documents you have available, the formats involved and your deadline. The aim is to define the views that are actually useful before starting production.
Frequently asked questions before ordering
Can we start without a finalised landscape plan?
It depends on what is missing and how much the landscaping matters to the image. Flag any areas that are still provisional and agree on usable assumptions. If the choice would significantly change the framing or the visible access points, it may be better to settle it before detailed production begins.
Is a BIM model enough to produce the 3D site plan?
It can provide a useful working base, but its content, version and usable elements still need to be confirmed. The context, materials, landscaping, annotations and marketing framing can all require additional work. Also supply the reference documents needed to check what will be shown.
What is the difference with an orbital 3D model?
A site plan delivered as an image presents a single, fixed viewpoint. An orbital 3D model lets people explore the scheme from several angles. If you also want to be able to select individual buildings or display information, describe those functions separately: they are not implied by an order for a static image.
Do we need one image per building?
Not necessarily. A single overview can be enough to convey the layout, with additional formats explaining specific buildings or units where needed. Start from the sales questions that need answering and the areas that are genuinely hidden from view, rather than applying a fixed number of views by default.
Can the visual be updated after the project changes?
This needs to be discussed with the studio. Identify the version already in circulation, the changes involved and the formats affected, then have the scope of the update confirmed. A change to a building or the landscaping should not circulate only through an isolated exchange — it needs to feed back into the reference documents.
In summary
A clear brief turns a 3D site plan into a working tool for your sales teams: the right documents, an agreed viewpoint, legible markers and deliverables sized for every channel. Contact VIZION STUDIO to scope your own 3D site plan, starting from the documents and formats you already have.
3D services to bring your project to life
Preparing a property launch or an architectural presentation? Explore deliverables and examples relevant to this topic.
Give your project the images that will sell it
Get your first 3D image within 72 hours. Free quote, no commitment.